Look taller in a photo with photo editing
"To look taller in a photo is the objective of the girl in the picture below. A height increase of about 3 inches is required. The finished photo should give the impression of longer limbs — a taller person. Also, soften the jawline where it seems to jut out prominently."

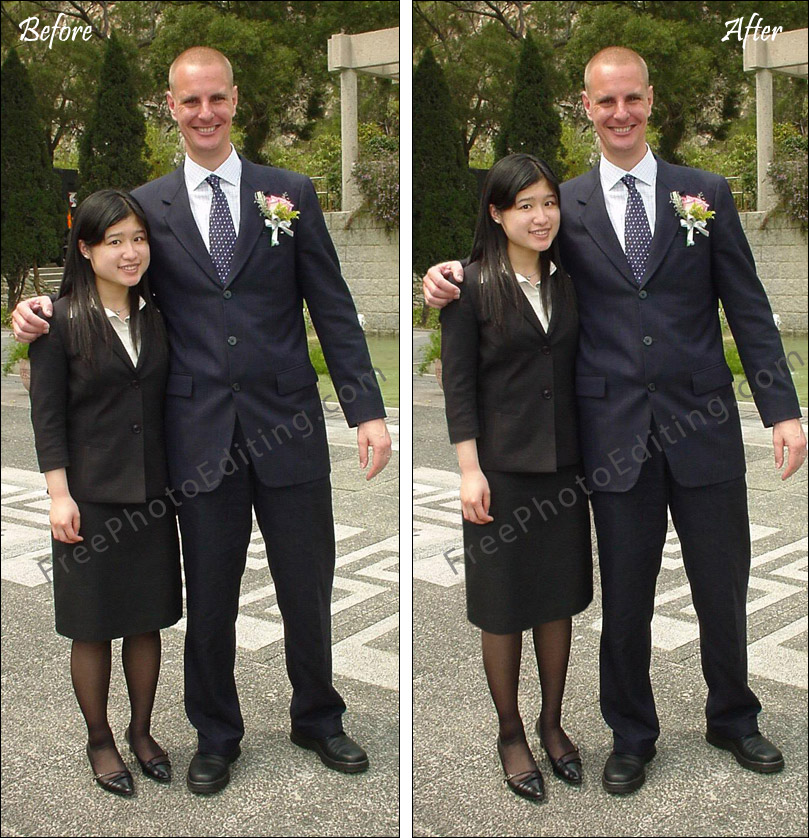

We enjoyed working on this before-and-after photo editing example of height increase. This was not a regular case of lengthening the legs to make a person look taller. In fact, the photo editing challenge was even greater because while the subject (i.e. the girl in the picture) has a regular length upper torso she has disproportionately shorter arms and legs. If you look carefully, you will see that the besides making the legs longer and a bit more slender, the arm has also been lengthened. Note that the neck has been lifted and the hair at the top of her head have been puffed up a bit helping to aid the illusion of height.
What complicated matters somewhat in this example are that the subject is not standing by herself in the photograph. Changing her height meant not only adjusting the background around her but also editing one side of the man's body she is standing beside.


Increase your height
Look taller in a photo; lengthen legs
By our reader Sarah Tomkins
Most Photoshop artists resort to the Free Transform tool for leg lengthening. but then you don't have that much control over sculpting the legs. All we were really able to do is just lengthen the legs a little bit. But all this changes if you use the Puppet Warp tool.
Go ahead and make a selection of the legs and copy to a new layer. Name this layer 'Lengthen Legs'. On this new layer, select Edit and hit Puppet Warp. You will see a fine mesh that sort of covers this new selection. Zoom a little bit by hitting Command + a few times. And while the Puppet tools works, it’s like a much an advanced version of the Warp tool. With the Puppet Warp tool you are able to set anchor points and select which points you want to move and which points you want to stay exactly where they are. You can nudge in and reduce the width of the knees. You can lengthen the legs and reduce the width of the ankles as well. All you need to do is add a few anchor points to this mesh of the areas that you want to keep unchanged and the areas you want to alter.
Alter body proportions with photo editing
It's important that you don't let the hips move, so you need to add anchor points appropriately. If you want to reduce the width of the knees, place an anchor point on both sides. If you don't want the calves to change at all do the same thing.
The first thing you should do is to reduce the width of the knees a little bit. So all you need to do actually is to click and drag on any one of these anchor points; just the thighs out and a little bit on the other side. You'll see that the only points that move are those points and the mesh surrounding that area, but not on either side of these surrounding anchor points. Just dodge in the width of the thighs here a little bit.
Now you can lengthen the actual legs and that will require another go at the Puppet Warp tool. Pan out a little bit. Remember that you don't really want to lengthen the thighs, you just want to lengthen the calves a little bit or from the knees down. So you should press a few more anchor points of the areas that you don’t want to move. Now go ahead and lengthen the knees down. So, click and pull down and hit Enter. You're done. Now admire the before & after results.
REQUEST A QUOTATION
Submit your photos for assessment and pricing
(no obligation)
![]()
We provide custom photo editing services.
Click here to submit assignment or ask questions.
'Quick' photo editing is free.
You will receive a quotation for 'Paid' jobs.
Complete privacy is guaranteed.
Read FAQ
