Samples >> Shadow Removal >> 3
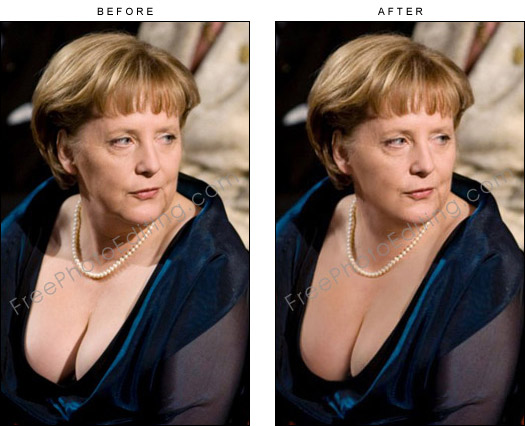
Shadow retouching: Shadow removal on neck, shoulders, chest and cleavage
We received this shadow retouching example suggestion from an Angela Merkel supporter. "German Chancellor Angela Merkel's April 2008 cleavage photograph has been an all time favorite. The truth is she looks simply gorgeous and stately in the Olso Opera House photo. There's an awful shadow in the neck and shoulder area, and also where the cleavage plunges. I fail to understand how no one in the media thought of cleaning up the shadows, considering the amount of airbrushing their production people resort to! Please remove the shadows."


View this complete picture which shows Chancellor Merkel with Norwegian prime minister Jens Stoltenberg at the opening of Olso Opera House in April 2008.


Remove harsh shadows
Retouch shadows from face using Photoshop
By our reader Melanie Nelson
This article is about fixing harsh or soft shadows in Photoshop. Imagine that you have a picture of a subject with one side of the face completely bright, well lit and the other side in shadows. This problem can be solved in Photoshop using the very basic concepts of blend notes and channels.
Get hold of an image in which one side of the face is well lit, but the rest of the face is in complete darkness. To brighten that side of the face, you will need to get rid of the shadows. To begin with, select the Channels step. If you cannot see the Channel step, go to Windows and make sure that Channels is checked.
Now, press and hold Control or Command and then click on RGB. This selects the brighter areas of the picture. When you hold Control or Command and click on RGB, it makes the selection based on luminosity, which means the brighter areas will be selected and the darker areas will not be selected. It's as simple as that. To explain: Let's say you create a new layer and fill it with any color, say black. You will see that the white areas, the bright areas will get painted with black. Ths means that when you make that selection by pressing Control or Command and clicking on RGB, it selects the bright areas of the picture.
Gentle shadow retouching
Now this is what you should do: Press and hold Control or Command and click on RGB. This selects the bright areas, but you want to affect the dark areas — the shadows. What should you do? The answer is that you should inverse the selection. Simple as that! Control + Shift I or Command + Shift I if you're using a Mac inverts the selection. Now, press Control or Command J. This puts the dark areas in its own layer. Now, go to Blend mode >> Screen. The shadows will be gone.
But here's the thing -- you don't want to get rid of the shadows in the surrounding areas, you only want to get rid of the shadows on the face. So go ahead and create a Mask. Press and hold onto option and click on the Mask button. This creates a negative mask. Now select the brush, make sure the program color is white and paint back in just the face with a soft brush. You don’t have to be perfect while doing this — just paint over her face with white. Now view your before and after versions
You can mostly only reduce shadows, not completely remove them
Remember one thing while editing a photo with shadows — you cannot completely remove shadows, you can only reduce them'. Just ind a happy place where it looks good. Some harsh shadows can be edited to become soft shadows but don't expect more than that.
In such situation where have you a lot of shadows here and there — mostly soft shadows — you should just reduce them. There's a little variation in the methodology though. You should go to Channels as before, press and hold Control or Command, click on RGB, then Control + Shift I to inverse the selection. Then change the Blend mode to Screen. You will now see that it is looking faded. You need to get rid of the brightness from the already dark areas from the super-dark areas. When you add this Screen layer, it darkens some areas. You don't want that to happen, you just want to brighten up the shadows which are moderately dark. Here’s what do — make this layer invisible from super-dark areas. To do that you should right-click on it and go to Blending options.
You are now at a point where the super-dark areas are becoming invisible. You can now move the shadows. Press on your larger option. Make the transition smooth between visible areas and invisible areas. Now have a look at the before and after.
Shadow editing in portraits
But sometimes what happens, which brings us to a new situation is that when you brighten up the shadows, i.e. when you reduce the shadows, you lose colors within the shadows, or maybe you see color shifts. In such cases, go to Channels, press and hold Control or Command and click on RGB and then use the Blend mode Screen. When you do that, add a mask. You might have to add Blending options. Take the feather from the left of the underlying layer. If you want to increase the shadows even more you can press Control or Command J again and this increases the shadow even more. Then make a group of both of those and add a mask. But you don’t want excessive shadows add a mask, a ''negative mask''. Then paint with white.
If you see a color shift it is because the color of the lighter area is warmer than the color of the shadows. On the Hue / Saturation adjustment layer, click on the green white circle icon, add a Hue / Saturation adjustment layer -- make sure it’s a clipping mask, which means that the Hue / Saturation adjustment layer is affecting only that layer, the layer which is brightening up the shadows. Press and hold your option and click on the line between these two layers. Now you can increase the saturation.
Brighten dark areas created by shadows
If you follow the steps above you will be able to fix shadows in Photoshop quite easily. A quick recap: Go to Channels >> press and hold Control or Command and click on RGB. This will make a selection based on luminosity, which means it will select the brighter areas of the photo. If you want to modify the darker areas, press Control + Shift I or Command + Shift I if you're using a Mac, it inverse the selection. Now press Control or command J. This will put the darker areas of the photos on its own layer. Change the Blend mode to Screen and then create a negative mask by pressing alt or option and clicking on the mask button, and then with the brush and white as a ground color, paint in the areas that you want to brighten.
REQUEST A QUOTATION
Submit your photos for assessment and pricing
(no obligation)
![]()
We provide custom photo editing services.
Click here to submit assignment or ask questions.
'Quick' photo editing is free.
You will receive a quotation for 'Paid' jobs.
Complete privacy is guaranteed.
Read FAQ
